Saturday, December 25, 2010

New Work

I've had a very busy fall/winter.  I had a couple of shows including a two month long holiday "store" called Art Mart in Syracuse, NY.  We pay a "booth fee", work 15 hours during the duration of the show and pay a reasonable percentage of our sales. Etsy sales have been steady and I have helped my very talented wife with a few of her custom orders.  The most recent one was for a returning customer that has sled dogs. We did some pendents for her last year. Here's Bonnie practicing for a race. Pretty cool. And then the ordered pendents.


I guess she liked these because this year she ordered Christmas tree ornaments, five sets no less. Mary Ann said she was going to give four away to her sledding friends and keep one for herself.  My wife found some husky pictures and I carved them out for her adding a bas-relief (low relief) to them. A bit of work, but pretty neat none the less. She does most of her work in porcelain, and her usual great job of glazing.


I say most of her work because she gets experimenting with my stoneware for her batches of  wood-fired beads that she will include in my firings and lately she has used my "Tully" clay for beads and gotten some really cool results. If you misses the Tully clay post, it's only a half dozen posts back.


She is showing the Tully clay beads in her post on Monday on her blog if you want to check it out. She is the serious blogging and posting artist in this house. Here is the link for her blog.

Saturday, October 2, 2010

NEXT CYCLE ... plus

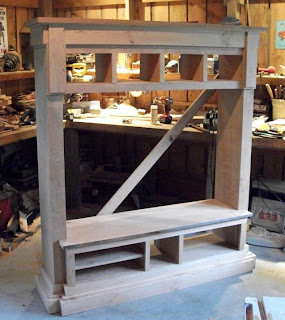
... plus a finished entertainment center :-)  Nice to have that done.  Not that I didn't enjoy the project, I like woodworking, I just wanted to get going on my next throwing cycle.  Mary Ann finished it with 3 coats, and it is starting to show signs on darkening already.  Eventually it will match the fireplace wood which is 3 years old now.  The sunlight ages cherry and darkens it to a nice patina of sorts. I included some of the details from the fireplace mantle in the entertainment center.  Rectangles of wood near the top corners... stuff like that.  I used rectangles of wood on the window trim too ( Craftsman style ).  The cherry picks up on the stone colors nicely. That's not real stone either! Not too bad for fake, a lot lighter too to install too.  I did a decent amount of stone and brick work for customers before, and now it pays off as "practice" for building my own home. 


Started throwing again... teaware (teabowls,teapots...) and some mugs I just finished putting handles on. And one more pulled teapot handle. I like the way the handle detail flows into the spout angle too. Back to the studio.

Friday, September 10, 2010

ONE PROJECT DOWN...

And 999 to go... I finished the entertainment center I showed you a little of last time I posted.  Here's a couple of views. I just need to sand and take the diagonal brace off. Mary Ann is going to varnish it.


And... speaking of views, I caught this one a little later in the day.

Sunday, September 5, 2010

SUMMER FIRINGS

Now that the Pottery Fair is over and I have a little break before I jump into the next batch for the holiday season, I want to show you some pics from the firings of the summer. This is the earlier summer firing, July something... Mary Ann said she needs to put more beads/bead racks in there, they went very quickly!  You can always see her ceramic beads at her etsy shop .


There were a few favorites of mine such as...


And then some pics from the second firing, only a few days before the show... These two show a nice "before and after"...


Some of that "bizenware" I have been talking about.


Flame inside the kiln and outside...


I'll start the cycle again very soon.  I am making an entertainment center out of cherry that I had rough sawn two years ago.  It has been "stuck" (sticks placed every 20" or so between each board so everything dries flat) and been drying for two years. Here's a preview... don't mind the mess and I included the sketch I made for it.


And... when I went up to the workshop to take a picture of the entertainment center, I noticed how beautiful the light and shadow is playing across the hills. So I took a picture of that too.


I can't wait for the fall... the color is stunning.

Tuesday, August 31, 2010

REMEMBER ME?

I can't believe it was July 4th.  I couldn't have been THAT busy.... was I??  I just logged on to post on my blog, 'cause I knew it's been a while... and there it was... July 4th.  Wow... sry 'bout that!  I remember thinkin' I have this really big show comin' in late August, the 21 and 22,  and I scored an excellent location this year.  So I figured I better make the best of it and... then I woke up.  It was a blur.  I remembered thinkin' I have two loads to fire, the July firing and one more just before the show.  I don't know how many of you have ever fired a wood-fire kiln, even a smaller one like mine, but for doing it by yourself, it's a lot of work. Not that I'm complainin', I like doing it, it's just that it takes a lot.  A lot of preperation, a lot of throwing, trimin', bisque firin' and glazin'... rememberin' (the "g" works on this key board... it's just my way of doin' this writin' stuff ...) what you wanted to try this time and what you were not going to try again. And then there's the "bizen" type ware, a fine particled, iron rich, clay body that works nice in the back of the kiln.  I had been doing tests the last few firings, trying to get the right blend so it would mature at cone 9, above the flues, and that had to be included.  Then you have to wad them all, load 'em a certain way, put in the door, and fire away.  The July firing went 13 hours and the August 16th firing took just shy of 15 hours.  By yourself, that's a lot of concentration. But... I like the results. 
So... I had this show,  I did well and had a great time with the new wood-fired raku kiln.  They put me in charge of it, 'cause I am the wood-firer guy, and it worked great.


We had the problem of firing freshly glazed pieces and needed to dry them quickly, so I thought of riggin' up a drying "kiln" next to it.  I made it kind of like a beehive type kiln, and heated it with my weed burner that I use for some of the candling time on my kiln at home.  We threw some embers in there and it worked very well.  We ended up having 10 minutes of drying, about a 20 minute firing time and 10+ minutes of reduction in the cans with coarse wood shavings. Folks were very pleased with a 50-ish minute turn over time and we got some great lusters as well.


I had my display up with a new sign, including a before and after of my last firing for folks to see (teachers, they never quit...)  so they would get an idea of the process. Here's a couple of pics I took of my set up.


I will show you the last firings in a day or two.  Nice to get back to blogging.

Sunday, July 4, 2010

A NEW THIS ... and a NEW THAT...

Just wanted to show you some brushwork I'm trying again. The tricky part is getting it hot enough without too much ash to obliterate the designs. Placement in the kiln is everything... well very, very important anyway.  Last time I tried it, I ended up with too much running.  I know this type of work is usually saggered... but, I gotta' try it this way.


Next new thing I'm going to try is making my own handles. I have been making grape vine handles from vines on the edge of the woods. There are three for starters.


 This is a very small kyusu that should hold about 5 oz, good for gyokuro.


I did some handbuilding too... A sake set made out of slabs, before glazing...


... and after glazing with a couple more pieces.


Back to glazing... and a couple more experiments.

Saturday, June 26, 2010

New Clay Experiments

I returned to the Tully Mudslide Friday after work. Back in April, 1993, there was a mudslide that covered a long stretch of road. The land was supersaturated with water after a snow blizzard and heavy rains that spring. Along the base of a mountain, the soil gave way and several homes were destroyed. There was 15 feet of clay and silty soil over the road. The dotted line shows where the underlying road is.  Between the red arrows are where the springs are.


I drove by and grabbed a handfull of what looked like pretty pure red clay many months ago. I did some initial tests with it, made a coil that wrapped around my finger and didn't crack, etc. I mixed it with my cone 10 stoneware in various percentages looking to lower my clay body by a couple/few cones, hoping to come up with a suitable clay body for the cooler back of my kiln. I have gotten a full cone 9 in the flues. I also knew that the "impurities" in it would give my clay some more character.

I stopped and talked to a few people, hoping to find the access to the posted land where I saw the tall "bank" of what looked like where the clay was. I stopped at this one house, and was greeted by some friendly dogs and Mike. We were joined by his brother Erik and they even grabbed a shovel and bucket for me (I had planned on returning later if I had gotten permission to dig). They were very generous with their time and met me down the road at the spot with their 4-wheeler and guided me to the sweet spot. We found a drumlin area that had mixed amounts of vegitation, and I liked the looks of this one barren, reddish clay looking spot that contained a "slippery when wet" clay. I filled the bucket with very pure looking clay.  It looks like it will take a minimal amount of preperation time to create test clay. I have a tray full of pieces drying so I can pulverize it and screen it.


 I will then mix it in various percentages with my clay and put it in my end of June firing.   I hope to end up with a clay body that matures in the cone 8-9 range that will be suitable for sculptures and pottery for the back of my kiln and in the secret chamber in the base of the chimney. I am also making some slips to try.  I have a 50/50 mix using both mixed hardwood ash and also pure poplar ash for a different color. Then there is a 40/60 and a 60/40 mix for starters.  Also in Jack Troy's book, Wood-Fired Stoneware and Porcelain, there's a great looking recipe "Jane Herold's glazes for once-firing". I'm trying #2, 

75 local red clay
15 ash
10 whiting
4 bentonite

Says it will make a dark celadon, amber over a white slip. There's a possible brine content in this clay, so it will be interesting to see the results. I'll keep you posted, or would that be blogged?  ;-)

Thanks again Mike and Erik Young! 

Tuesday, June 22, 2010

TWO FOR TEA

I haven't blogged in a long time, I have been getting a ton ready for my next firing at the end of the month. I have made an extra effort to create more and accurate tea ware.  What I mean by accurate, is making teapots for instance, just the right size. I was making "nice sized ones" but I was not aware of the specific sizes desired by tea drinking connoisseurs. I now know that they like 3-4 oz tea pots for making 2 oz of high quality tea (gyokuro) and these small ones are called kyusu or a houhin. Then they get big for sencha, like a  9 oz tea pot is nice. This will make two smaller pours or one bigger one. 

A completed small one on the right and a 9 oz one "scored and slipped" on the left ready to join. Parts in the background to choose from. A little more practice with composition in this scale and I'll know what size to make them. I made a total of five tea pots for starters.  I want to see if they shrink to the right size.


This is a close-up of the prep work. Don't make the holes too big or they won't strain well and not too small or it will pour slow and continue to steep the tea (too long).


Then you press them together with wiggles to make the slip ooze out. Then you know it won't crack under firing stresses. Clean it up with a bristle brush and voila!


A completed small kyusu. It will hold about 5 oz when done.


The tea bowls are good to have half again to twice the size of the serving. A 6-8 oz capacity tea bowl holds 4 oz of tea nicely and so on.  I have gotten most of this tutorial from a good customer of mine named Brian that lives in Colorado.  Thanks Brian!  He doesn't know it (until now anyway) that he will have a little thank you in his next order. Here are a few I threw "off the hump".


This pic has a shui fan for a custom order and some tea caddies.


Shui Fan opened up.

Sunday, May 23, 2010

Campfire / Forest Fire Thing ... Part III

The Winners of the giveaways are:  Dawn for the mug and mywifesstudio for the yunomi. Congrats to them and I hope everyone had fun.  Contact me at williperri@aol.com with your name and address and I'll ship them out to you!  :-]


Now for some close ups...


 It was a nice firing and a great time... they came back to pick theirs up on Saturday Morning. Everyone was real pleased with the results! We will have them back next year, same time.